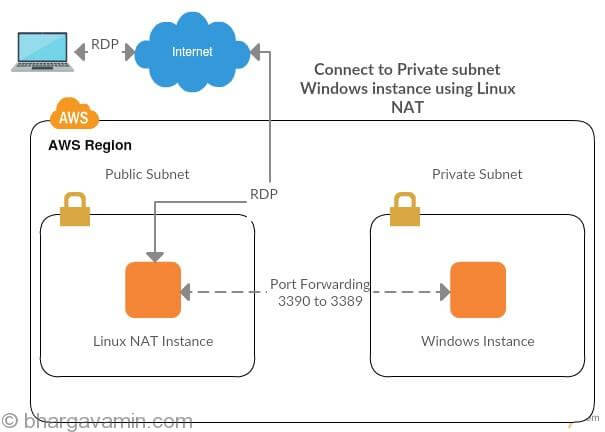
Usecase scenario : You have a requirement to setup a Windows instance that also in private subnet. You will need an RDP connection to access the instance in public subnet. You will be stuck at a question that how to connect to Private Subnet Windows instance using Linux NAT ? right? I have written a complete solution for the same below.
Problem statement : You won’t be able to do RDP directly as the instance is in private subnet, also it does not have a public EIP.
Solution : In this scenario the only way to create a RDP connection is to setup a port forwarding on Linux NAT.
Please follow step below mentioned connect to private subnet Windows instance using Linux NAT :
To achieve your goal you can setup an Amazon NAT instance manually or using the VPC wizard.
In order to setting up the NAT instance, by using the VPC wizard, please refer to the link : https://docs.aws.amazon.com/AmazonVPC/latest/UserGuide/VPC_Scenario2.html#main-col-body
The wizard performs many of the configuration steps for you, including launching a NAT instance, and setting up the routing. However, if you prefer, you can create and configure a VPC and a NAT instance manually using the steps below :
Step 1 : Create a VPC with two subnets (one public and one private).
Step 2 : Create the NATSG security group. You’ll specify this security group when you launch the NAT instance.
– In inbound Rules Select RDP from the type list.In the Source field, specify the Public Ip address range of your home network.
– In outbound Rules choose Add another rule, and select RDP from the Type list. In the Destination field, specify 0.0.0.0/0.
If you will need internet access from your windows instance you should allow HTTP and HTTPS traffic by Adding rules for inbound traffic using the Inbound Rules as follows :
– Choose Add another rule, and select HTTP from the Type list. In the Source field, specify the IP address range of your private subnet.
– Choose Add another rule, and select HTTPS from the Type list. In the Source field, specify the IP address range of your private subnet.
For the outbound rule :
– Add another rule, and select HTTP from the Type list. In the Destination field, specify 0.0.0.0/0
– Add another rule, and select HTTPS from the Type list. In the Destination field, specify 0.0.0.0/0
Step 3 : Launch an instance into your public subnet from an AMI that’s been configured to run as a NAT instance (search in the community AMI for amzn-ami-vpc-nat. One recent AMI for this purpose is the ami-a2971ed1).
Step 4 : Disable the SrcDestCheck attribute for the NAT instance.
Step 5 : If you did not assign a public IP address to your NAT instance during launch, you need to associate an Elastic IP address with it.
Step 6 : Update the main route table to send traffic to the NAT instance.
Step 7 : Setup port forwarding on NAT
Log into your Linux NAT
After you’ve setup your VM NAT using the VPC wizard, you are going to have to add in forwarding rules to the NAT program, also called iptables.
Editing Iptable rules
Open root shell by typing the following: sudo -s
You need to forward all requests on port 3390 from your NAT box to your RDP box, which listens on port 3389. My NAT box address is 10.0.0.1 and the box I am trying to RDP to is 10.0.1.10.
To do this – enter the following:
sudo iptables -t nat -I PREROUTING -d 10.0.0.1 -p tcp --dport 3390 -j DNAT --to 10.0.1.10:3389
Save the rules:
sudo service iptables save
Check it using :
sudo service iptables status
You should see something in the PREROUTING section of the nat table.
Step 8 : Testing Your NAT Instance Configuration
After you have launched a NAT instance and completed the configuration steps above, you can perform a test to check if an instance in your private subnet can access the Internet through the NAT instance by using the NAT instance as a bastion server and you should be able to access to your Windows Instance by using RDP protocol.
Please check the security groups of both NAT and Windows instance to make sure you have configurations such as :
NAT
- Port 80, 443, 3390 are opened
Windows
- Port 80, 443, 3389 are opened
Enter IP address of NAT followed by port 3390 :

That’s it you would be able to connect to Private Subnet Windows instance using Linux NAT Public IP address.
References :
https://docs.aws.amazon.com/AmazonVPC/latest/UserGuide/VPC_NAT_Instance.html#NATInstance
https://docs.aws.amazon.com/AmazonVPC/latest/UserGuide/VPC_NAT_Instance.html#NATInstance
https://docs.aws.amazon.com/AmazonVPC/latest/UserGuide/VPC_NAT_Instance.html#NATSG
https://docs.aws.amazon.com/AmazonVPC/latest/UserGuide/VPC_NAT_Instance.html#nat-routing-table
https://docs.aws.amazon.com/AmazonVPC/latest/UserGuide/VPC_NAT_Instance.html#nat-test-configuration


Social Profiles