Steps to set JAVA enviroment variable on Amazon Linux in 4 simple steps. (Updated 14th Jan 2020)
Step 1: Check & install correct JAVA version (Optional)
Check if JAVA exists on your device by running : java --version
The latest version of JAVA OpenJDK is 1.8, by default Amazon Linux AMI may or may not a JAVA installation so you would directly want to install/upgrade it use below command :
You can list all the available OpenJDK versions using : sudo yum list | grep openjdk
You can select the desired version from the output list and install it
sudo yum install java-1.8.0-openjdk.x86_64
If you already have JAVA installed you can change/check the JAVA version using below command.
$ sudo update-alternatives --config java
Note: If above command doesn’t give any JAVA version option then try once again after running sudo yum update -y command.
Select an option as shown in the image below:

Note: It is advisable to remove the previous version so that it doesn’t switch back.
Step 2: Find out where JAVA is!
For Linux systems, you can recursively run the commandfile followed by which command to find the JAVA installation location as shown in the image below.
$ file $(which java)
/usr/bin/java: symbolic link to `/etc/alternatives/java'
The above output shows that JAVA is pointing to a /etc/alternatives/java file but that is not the actual location of JAVA hence you will need to dig in more to fetch its actual path.
Step 3 : Follow the lead!
In the previous step, we located /etc/alternatives/java file this file will get us to the actual location where JAVA config files are.
Run the file command on that location /etc/alternatives/java.
$ file /etc/alternatives/java
/etc/alternatives/java: symbolic link to `/usr/lib/jvm/java-8-openjdk.x86_64/bin/java'
There you go… You’ve now located JAVA config file location which we will use in below steps to set JAVA environment variable
You can re-affirm the location running file command on the symbolic path:
$ file /usr/lib/jvm/java-8-openjdk.x86_64/bin/java
/usr/lib/jvm/java-8-openjdk.x86_64/bin/java: ELF 64-bit LSB executable...
This means that the JAVA is installed perfectly, Now go ahead and copy the path of above output
/usr/lib/jvm/jdk-1.8.0-openjdk.x86_64/bin
Step 4: Set JAVA environment variable
To set the JAVA_HOME environment variables on Linux/Unix go to .baschrc file.
Note: .bashrc file is different for each user in Linux, hence you will need to update the same file for every user you want to set environment variable for.
Copy paste below two lines in the .bashrc file found in home the directory of ec2-user and root user:
 export JAVA_HOME="/usr/lib/jvm/jdk-1.8.0-openjdk.x86_64"

 PATH=$JAVA_HOME/bin:$PATH
Save the file and run the following command:
source .bashrc
Note: Running the source command is mandatory otherwise you will not see the environment variable set.
Alternatively, you can also set $PATH variable through the command line:
Run the following command to add $JAVA_HOME variable to $PATH:
$ export PATH=$PATH:$JAVA_HOME/bin
That’s it! You’ve successfully set the environment variable for JAVA on EC2.
You check the JAVA and environment variable using this command :
$ echo $JAVA_HOME
$ echo $PATH
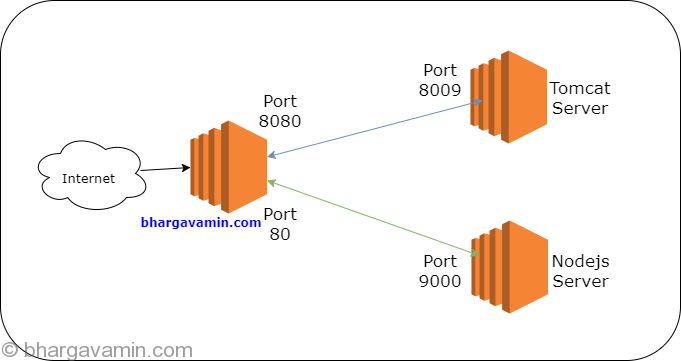
This way you can then install a tomcat server without worrying about environment variable setting.
By default, AWS Linux AMI does not have environment variables set, so it’s recommended that you create an image of configuring AMI so that you don’t have to set variables every time you launch a new instance.
Hope this help!
-Bhargav


2 comments On Setting up JAVA environment variable on Amazon Linux – EC2
Pingback: Install Jenkins on Amazon Linux (AWS) - Bhargav Amin ()
Pingback: Install & Configure SonarQube on Amazon Linux (AWS) - Bhargav Amin ()
Comments are closed.