Jenkins is one of the best tool used in IT industry to automate tasks such as building, testing, and deploying software. On cloud majority of startups and well-established companies prefer to have separated builds, this means they separate the software process in terms of different environments/stages.
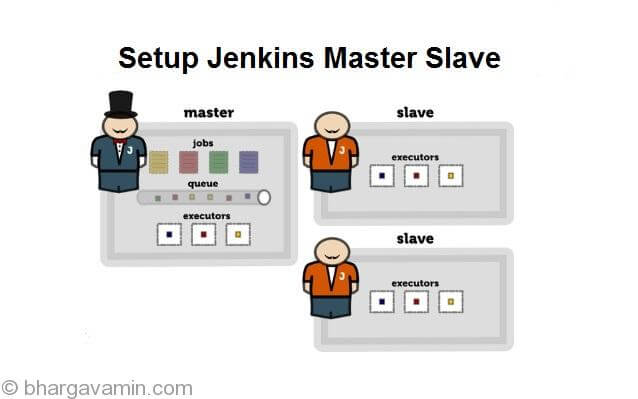
If a company runs its software development process in a distributed environment, then it needs different/separate machines for build, test and deployment tasks. An ideal fit for this type of architecture is Jenkins Master Slave deployment. Where you have a single master node under which there is n number of slave nodes performing different operations.
Jenkins slave is generally required to provide desired environment, it works on basis of request received from Jenkins master. This article is a step by step guide to set up Jenkins Slave on Amazon Linux EC2 instance.
Before we start ensure that you’ve had all pre-requistes in place.
Pre-requisites :
- Amazon Linux instance with Jenkins installation. This instance will be your Jenkins master
- Another Amazon Linux instance which will be your slave.
- Make sure you’ve port 8080 opened on both master and slave instance.
- On slave, instance create a user named
jenkinswithsudoprivileges
Step 1. Create a Jenkins Slave node
Since you would have already instance Jenkins on Master instance you can directly move to this setup. If you haven’t then you can refer to this document for installation. https://bhargavamin.com/how-to-do/install-jenkins-on-amazon-linux-aws/
On your master machine go to Manage Jenkins > Manage Nodes > New Node

Next enter Node name and click ok

Step 2. Configure Node
Here you will fill all the details about the node as follows :

Note : if you are not able to see Launch Method : Launch Agent via Java Web Start then you need to enable TCP port for JNLP agents.
Go to Manage Jenkins > Configure Global Security
There enable the TCP port for JNLP agents and save it.

Step 3. Setup Jenkins Slave
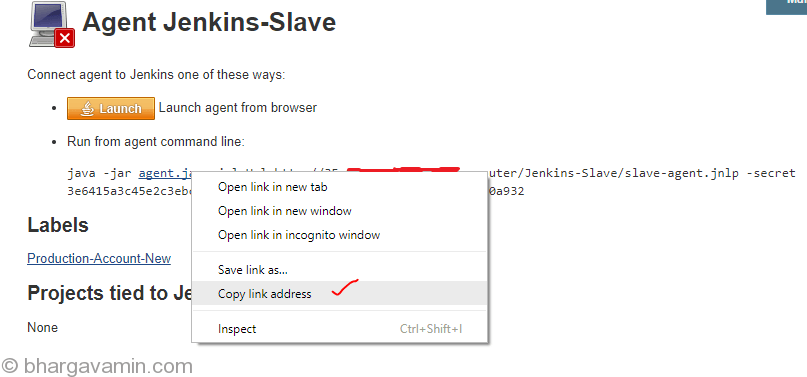
Once you’ve saved the node configuration in above setup it will show you a page with a link and command which you will have to execute it on Slave EC2 instance.

Below steps to be performed on Slave EC2 instance :
Download agent.jar on the /opt/jenkins path.
If you don’t have Jenkins directory in /opt than create one.
You can get the link to slave.jar by right click on it
You can download agent.jar on EC2 instance by following command :
sudo wget <copied link>

Now that you’ve have download agent.jar/opt/jenkins directory. It time to connect same EC2 instance to Master Jenkins.
Copy the command you found on Master Jenkins > Slave node Page
Copy the command shown in above image and execute it on Slave instance at the /opt/jenkinslocation.
Note: Before executing the command switch the user to jenkins and then execute it on Slave instance.

The output should be connected. This means Slave instance has successfully connected to Master Jenkins via JNLP agent.

If the connection had failed then you should check your security group and open port 8080 with Slave instance IP on Master Jenkins. Also, make sure the IP of Master Jenkins is correct in the command.
In order to ensure that the agent remains connected then you need to run the above-mentioned command via jenkins user and with nohup utility which will run this process in background.
nohup java -jar agent.jar -jnlpUrl http://52.1.11.111:8080/computer/Jenkins-slave/slave-agent.jnlp -secret 4a36971c88afff8c142077b74f6797ab7b812816831293020c04cb275ed06dae &
Now you’ve successfully setup a Jenkins Slave which will be up all the time no matter what and where all the task will be executed which were triggered on Master Jenkins server.

This concludes this article if you’ve any doubts or queries feel free to comment below.
-Bhargav


Social Profiles